


Kimchi Pancake
김치전


Feel like a nice little snack? Yet don't have much at home other than Kimchi? Kimchi Pancakes are so simple to make, and of course, taste heavenly. Great to pair with alcoholic beverages like So-Ju!
Buy Korean pancake mix online here.
Feel like a nice little snack? Yet don't have much at home other than Kimchi? Kimchi Pancakes are so simple to make, and of course, taste heavenly. Great to pair with alcoholic beverages like So-Ju!
Buy Korean pancake mix online here.
INGREDIENTS
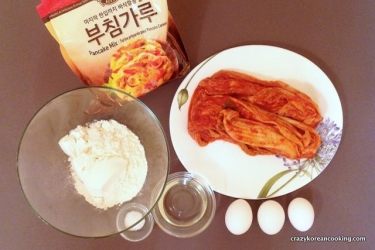
shop these ingredients online »| 3 lb 8 oz | Kimchi 김치 | |
| 3 cups | Buchimgaru (Korean Pancake Powder) 부침가루 | |
| 2½ cups | Water 물 | |
| 4 | Egg 계란 | |
| ¼ tsp | Salt 소금 | |
| 1 cup 2 tbs | Vegetable Oil 식용유 |
Optional Ingredients and Substitutions
- You can use plain all purpose flour instead of buchimgaru (korean pancake mix). buchimgaru (korean pancake mix) does make it more flavorful and crispy though.
- You can use olive oil or butter if you don't have vegetable oil.
Good to Know
Amount of water:The amount of water may vary depending on how much sauce your kimchi has and how much kimchi juice you are adding. Also, it depends on your preferred texture.
Crispiness: If you in general like crispy stuff, reduce water to get consistency that is drier than western pancake batter. Also, try to spread the mix as thinly as possible, add more oil and cook in on high heat.
If you like more soft buttermilk pancake like texture, add more water or kimchi juice and cook on medium to low heat.
Thickness: In general, Korean pancakes are thinner than western breakfast pancakes (somewhere between crepe and pancakes in terms of thickness). You can make it thicker but remember to cook on low heat to ensure the pancake is cooked through.
Spiciness:
If you cannot handle spiciness, rinse the kimchi and drain. Note that if you are washing out the kimchi seasoning, you will need more salt in the batter.
How do I store the left over?
Place in a sealed container and keep it in the fridge. You can keep it for 2-3 days.
To keep it for a longer period, freeze it in a tightly sealed container. Thaw and microwave it to warm it up but don't overcook it.
More questions? Please leave your questions below in the comment section. We will do our best to answer as soon as we can.
instructions |
photos |
summary |
|---|---|---|
Ingredient amounts in the recipe instructions are for the default serving size. |
Click to enlarge photos. |
Ingredient amounts in the recipe summary are for the default serving size. |
1. Cut KimchiCut about 800g or 2-3 nappa cabbage quarters of Kimchi (½-¾ of a whole nappa cabbage kimchi) into 1 to 2 inch pieces. If you want the pancake to be cut into small bite sizes later, cut the kimchi into smaller pieces. If you cannot handle spiciness, rinse the kimchi and drain. Note that if you are washing out the kimchi seasoning, you will need more salt in the batter. |
 |
1
Cut Kimchi 1-2 inches |
2. Make pancake batterMix 1½ cups of buchimgaru (korean pancake mix), 1¼ cups of water, 2 eggs and cut up kimchi. Season with ⅛ to ¼ tsp of salt if you are using plain flour. Mix thoroughly until there is no lump. The amount of salt will be different depending on how salty your kimchi is. You can put a drop of the mix on your tongue to taste it. Also, you can add kimchi juice to make it more spicy and flavorful, which means you have to reduce the amount of water. You want the mix to be a little drier than the western pancake batter consistency. |
 |
2
Mix
Season with salt |
3. PreheatCoat a pan with vegetable oil and preheat on medium heat. For extra crispy ones, use high heat. |
 |
3
Coat pan with oil Preheat Med Heat |
4. Pour the mixturePour 1-3 ladles of the mixture (depending on the size the pan). Move the pan in circular motion so that the mixture is evenly spread throughout the pan. Aim for less than ¼” (about 5 mm) for thickness. If you like the pancake crispy, add more oil, preheat the pan on high heat, and spread the mixture as thinly as possible. |
 |
4
Pour mixture Spread evenly |
5. CookCook until the bottom is golden brown and flip. Then, cook the other side until golden brown. If your pancake is thick, cook on low heat so that it’s cooked through. |
 |
5
Cook Med Heat Flip Med Heat Until golden brown |
6. Let it sitRemove from the pan and cool it down for 5 min before cutting. Otherwise, it won’t cut cleanly. |
 |
6
Cool down |
7. CutCut into squares. You can use kitchen scissors to cut easily. |
 |
7
Cut into Squares |
8. ServeServe on a plate |
 |
8
Serve |
9. Serve 2You can also serve without cutting so people can use chopsticks to tear the pancake. |
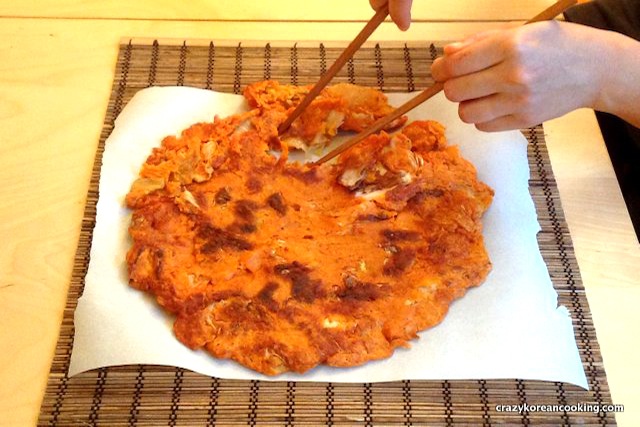 |
9
|

 3 min
3 min
Comments