


Kkakdugi Recipe, Radish Kimchi
깍두기


Kkakdugi is a type of kimchi made with Korean radish ("mu" in Korean). Kkakdugi pairs well with soups like seolengtang (ox tail soup) and noodle soups but it can be enjoyed with any meals. The seasoning for kkakdugi is very similar to that of napa cabbage kimchi. But, Kkakdugi has a more refreshing flavor and a crunchy texture because of the characteristics of Korean radish.
You can vary the amounts of gochugaru (red chili flakes), sugar and fish sauce to your liking.
See other types of kimchi here.
Buy Organic Kosher Gochugaru, Korean Red Pepper Flakes here.
Buy non-GMO Kosher Gochugaru, Korean Red Pepper Flakes here.
Buy Probiotic Fermentation Kimchi Container here.
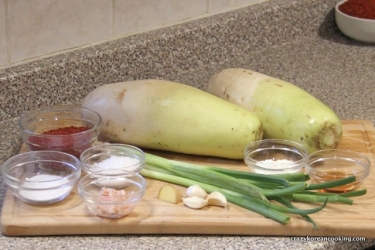
INGREDIENTS
shop these ingredients online »| 12 lb | Korean Radish 무 (1 radish is about 2-3 lb or 0.9-1.36 kg) | |
| 1⅓ cups | Coarse Sea Salt 굵은 소금 | |
| 2 tbs | Sweet rice flour 찹쌀가루 (or regular flour) | |
| 2 cups | Water 물 | |
| 1⅓ cups | Gochugaru, Korean Hot Pepper Flakes 고춧가루 (can use anchovy fish sauce instead or use half shrimp fish sauce & half anchovy fish sauce | |
| ½ cup | Shrimp Fish Sauce (Sae Woo Jeot) 새우젓 | |
| 12 | Green Onion 파 | |
| ¾ cup | Sugar 설탕 | |
| 2⅔ tbs | Garlic (minced) 다진 마늘 | |
| 2 tsp | Ginger (minced) 다진 생강 |
*The default serving of this recipe is set to 2. For this recipe, 2 servings refer to about 1 large Korean radishes or 2 medium Korean radishes which yield about 38 ounces of kkakdugi (about 4¾ cups). Please note that ingredient amounts in the recipe instructions are for the default serving size.
kitchen tools
- 1 large bowl for brining process
- 1 large strainer for draining water
- 1 small pot to make flour mix
- 1 medium bowl for seasoning
- 1 large bowl to mix radishes with seasoning
- 1 pair of rubber gloves for kimchi making
- 1 kimchi container (earthenware, glass bottle, stainless or plastic container with a lid)
Buy Kkakdugi or Kimchi ingredients online here.
Buy Probiotic Fermentation Kimchi Container here.
Buy Gluten Free, Chemical Free Kimchi here.
Optional Ingredients and Substitution
Shrimp fish sauce: For Kkakdugi, shrimp fish sauce is better than other types of fish sauce because it keeps the refreshing taste which is key to Kkakdugi. Also, other types of fish sauce can darken the color. However, some Koreans use anchovy sauce only or a mix of shrimp fish sauce and anchovy fish sauce.
Korean radish (mu): Contrary to popular belief, Korean radish is actually slightly different from daikon. They belong to the same species called R. sativus but are different varieties. You can use daikon instead of Korean radish but keep in mind that it will have a slightly different taste and texture than that of authentic Kkakdugi.
Good to Know
Amount of Kkakdugi
The default serving amount of this recipe calls 1 large Korean radish. Usually ¼ large Korean radish is good for a meal for 4 people.
(1 large napa cabbages = 16 servings. If 2 people eat Kkakdugi once a day, it will last 1-2 weeks.)
Use rubber gloves!
Use clean food-safe rubber cloves for brining cabbages and applying seasoning. Otherwise, your hands will sting from salt and chili peppers.
Seasoning Leftover
If you have made more seasoning than you need, you can freeze the seasoning. When you make kkakdugi next time, thaw the seasoning in the fridge overnight and use it. Also, you can use other types of kimchi with your favorite vegetables such as cucumber, soybean sprouts, garlic chives, green onions, etc.
Frequently Asked Questions
Do I have to use coarse sea salt?
You can use kosher salt. But, coarse ones are better than fine ones. If the particles are too small, it may speed up the brining process too much that the texture of Kkakdugi may not be as crispy. We don’t recommend using table salt (iodized salt) because iodine prevents fermentation and the texture and the color of Kkakdugi may not turn out right.
You can buy coarse sea salt from local Korean market or order online here.
How long should I ferment Kkakdugi for?
Fermentation time depends on temperature and the amount of salt in the Kkakdugi. A lower temperature and smaller amount of salt will make the fermentation process slower. The duration of fermentation also depends on your personal preference. Some people like fresh (almost unfermented) kkakdugi. Some like it very fermented and sour.
I personally like my kkakdugi fermented to medium sourness. I leave it out in room temperature for about 2 days. The best way is to leave it out and taste it every day. When it reaches your preference, put it in the refrigerator. If you made a large amount, you can leave some out and store the rest in the fridge right away. Then, take some out later for more fermentation as needed.
Remember that kkakdugi will produce gas and liquid as it is fermented. Leave some room in the container, or it will overflow.
How should I store my kkakdugi and how long does it last?
Traditionally, kimchi (including kkakdugi) was stored in earthenware called "Ong-gi." Ong-gi (Onggi) is breathable pottery that keeps kimchi and other fermented foods in an optimal condition. Today, most Koreans use plastic or stainless containers to store Kimchi, and keep the containers in a specialized Kimchi fridge. Kimchi fridges keep kimchi at an optimal temperature, and keeps your regular fridge free of the potent kimchi smell.
If you don't have any of the above, place the kimchi in a tightly sealed container and keep in the fridge.
When you place kkakdugi in a container, make sure you press down firmly to get rid of any air between kkakdugi. Then, cover the top with a plastic sheet or saran wrap before closing the lid. (This is only necessary if you are making a large amount and storing it for months.) Finally, make sure the lid is on properly.
Kkakdugi can last 2-3 months or longer in the fridge but it may get sour in taste.
More questions? Please leave your questions below in the comment section. We will do our best to answer as soon as we can.
instructions |
photos |
summary |
|---|---|---|
Ingredient amounts in the recipe instructions are for the default serving size. |
Click to enlarge photos. |
Ingredient amounts in the recipe summary are for the default serving size. |
1. Peel radishPeel Korean radish(es) with a peeler. Quickly rinse them to remove any dirt. Some Koreans leave the skin on for texture and nutrients. If you want to leave the skin on, wash thoroughly using a scrub before using. |
 |
1
Peel radishes Rinse |
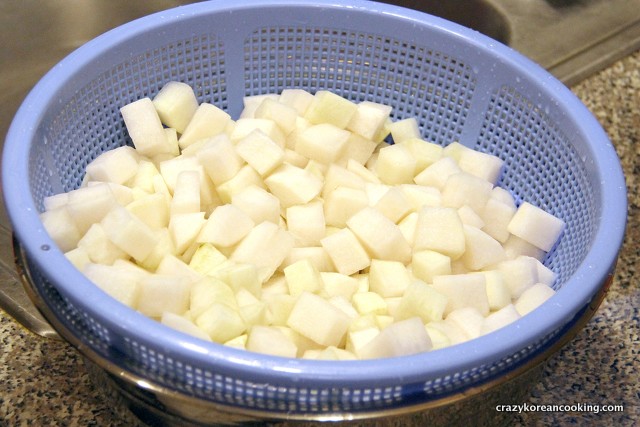
2. CutCut the radishes into bite-sized cubes (¾” x ¾” x¾” or 2cm X 2cm X2 cm). |
 |
2
Cut radishes into cubes (¾” x ¾” x¾”) |
3. SeasonIn a large bowl, throughly mix the coarse salt with cubed radishes. Let it sit for about one hour. During the one hour, mix it around every 20 minutes so that the radishes are evenly seasoned. |
 |
3
Sprinkle sea salt Leave (mix it up every 20 min) |
4. Wash & drainWash the seasoned radishes in a large bowl of water three time each time with fresh water. At this point, it should taste a tiny bit saltier than you like. The saltiness will decrease as they get fermented later. If it’s extremely salty, wash more to desired to saltiness. Leave them in a strainer for at least 1 to 2 hours to drain water out completely. |
 |
4
Wash three times Drain |
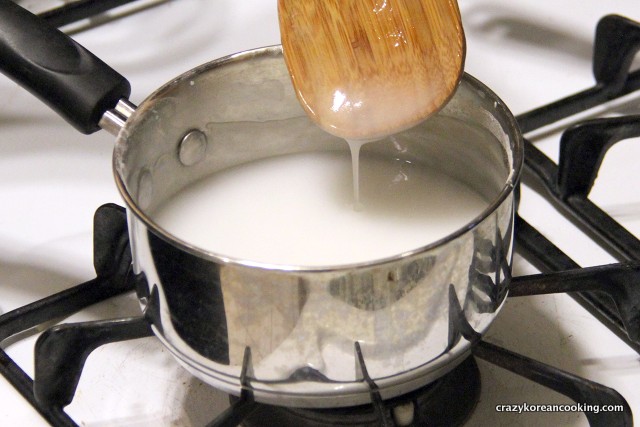
5. Make flour soupMix sweet rice flour (or regular flour) with COLD water. Stir until there are no lumps. Cook on medium heat while stirring until it reaches “cream soup like” consistency. Take it off the heat and leave it for at least 30 min. |
 |
5
Mix
Cook Med Heat
Cool down |
6. Make gochugaru pasteAdd gochugaru (hot pepper flakes) into the flour soup. (If you can’t take very spicy food, reduce the amount of gochugau. Mix well. Leave it for about 20 min to get more vibrant color (optional). |
 |
|
7. Prepare vegetablesWash and cut green onions into 1 inch pieces. Mince garlic and ginger. |
 |
7
Wash & cut green onions Mince garlic Mice ginger |
8. Make seasoningIn a medium bowl, mix all remaining ingredients (shrimp fish sauce, green onions, minced garlic, minced ginger and sugar) into the gochugaru paste. You can use anchovy fish sauce instead of shrimp fish sauce. |
 |
8
Mix
into gochugaru paste |
9. Apply seasoningIn a large bowl, throughly mix the radish cubes with the seasoning. Don’t pour all the seasoning at once in case there is too much seasoning for the amount of radish. |
 |
9
Mix seasoning with radishes |
10. Place in containerPlace them in a container with a good seal. Do not completely fill the container and place a tray below the container. It can overflow as it produces liquid while fermenting. Once the container is filled, use your hand to pat down on kimchi so that it is tightly packed in the container. |
 |
10
In container Pat down |
11. CoverCover the top with a plastic sheet (cling wrap). Close the lid. If you are making a small amount and will be eating it in a week or two, you don’t have to cover with a plastic sheet. The plastic sheet keeps the air out so it reduces a chance of getting molds. Alternatively, you can use a specialized kimchi container or fermenter with a vacuum seal. You can buy the container here. |
 |
11
Cover with plastic sheet Close the lid |
12. FermentLeave it out in room temperature for a day or two for proper fermentation until it has a sour taste you like. (If you are not eating it soon, refrigerate immediately. Then, leave it out a day of two when you want to ferment it further.) If you have time, you can ferment the kimchi slowly in the refrigerator but this can take a few weeks. |
 |
12
In container Room temperature
|
13. StoreAfter they are fermented, keep them in the fridge. Kkakdugi lasts for a few weeks when refrigerated. You can keep it longer but it may taste too sour. Kkakdugi tends to be fermented faster than napa cabbage kimchi. |
 |
13
Store in the fridge |
14. ServeServe COLD as a side dish (usually 5-10 pieces per person). |
 |
14
Serve |
 60 min
 about
about
Comments
You can now buy kimchi container here! http://crazykoreanshopping.com/kimchicontainer
Happy cooking!