Braised Beef and Eggs, Jangjorim
장조림


Janjorim is a traditional Korean side dish that always reminds me of mom's lunch boxes. I still can't believe every single morning mom made lunch boxes for all three of us. A lunch box usually consisted of rice and 2-3 side dishes. Mom tried to vary the side dishes daily so we wouldn't get bored of the same stuff. Lunch time was always something to look forward to in the midst of hard school life. (Trust me, Korean schools are hardcore!) It was even better when the lunch box was filled with my favorite things. I remember being always pleasantly surprised by Janjorim, especially when it was made with quail eggs.
This is a very delicious side dish that can be eaten for any meal. It can be kept in the fridge for more than a week, so you can make a big batch and then serve small portions whenever you don't feel like cooking. You can warm it up in the microwave for 1-2 min before serving.
Buy Korean ingredients online here.
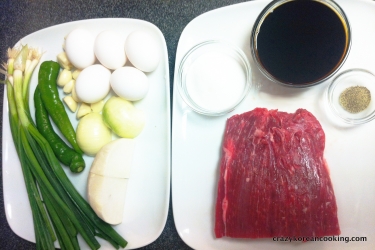
INGREDIENTS
shop these ingredients online »for beef broth | ||
| 1 lb 5 oz | Beef, flank 양지 (can also use shank or brisket) | Buy |
| 10 cups | Water 물 | Buy |
| 1 | Onion (Medium) 양파 | Buy |
| 2 | Green Onion 파 | Buy |
| 3 clove(s) | Garlic Clove (whole) 통마늘 | Buy |
| 4 oz | Korean Radish 무 (optional) | Buy |
| 2 tbs | Cheongju, Korean Rice Wine 청주 (optional) | Buy |
| ½ oz | Peppercorn 통후추 (optional) | Buy |
for seasoning | ||
| 1½ cups 2 tbs | Soy Sauce (regular) 왜간장 | Buy |
| ½ cup 1 tbs | Sugar 설탕 | Buy |
| 9 clove(s) | Garlic Clove (whole) 통마늘 | Buy |
| ¼ tsp | Black Pepper 후추 | Buy |
| 2 | Green Chili Pepper 풋고추 (optional) | Buy |
| 15 | Quail Egg 메추리알 (optional, or can use fewer chicken eggs) | Buy |
Optional Ingredients and Substitutions
Quail eggs or chicken eggs: You don't have to add any eggs if you don't like them.
Radish and green chili peppers can be omitted. Instead of green chili pepper, you can use dried red chili pepper for a spicy kick.
Cheongju (korean rice wine) or white wine can be a very nice touch. Add 2 tbs when making broth.
Beef: For beef, you can use flank, shank, or brisket (any braising beef with grains that enables you to shred the meat nicely). Of course, you can use more expensive and tender cuts if you like.
You can also use pork or chicken instead of beef. For pork or chicken, add ¼ tsp of minced ginger.
Sugar: You can use brown sugar or agave syrup if you don't like to use regular sugar.
How to store
Place in a sealed container and keep it in the fridge. If someone has touched the leftover with their chopsticks, you can boil it once and cool it down before storing it in the fridge.
To keep it longer than a week, freeze it in a tightly sealed container. Thaw and microwave it a couple of minutes to warm it up but don't overcook it. The meat freezes very well. Eggs can be frozen but won't taste as good. You can always freeze the sauce and the meat only and add freshly hard boiled eggs when you serve.
More questions? Please leave your questions below in the comments section. We will do our best to answer as soon as we can.
instructions |
photos |
summary |
|---|---|---|
Ingredient amounts in the recipe instructions are for the default serving size. |
Click to enlarge photos. |
Ingredient amounts in the recipe summary are for the default serving size. |
1. Soak beefSoak beef in cold water for 20 min to remove blood. This is nice to do to get rid of gamey smell but you can get away without doing. |
 |
1
Soak beef in cold water
|
2. Cut onionWash, peel and cut the onion into quarters. |
 |
2
Wash Peel Cut
|
3. Cut green onionsWash and cut green onions into 5 inch pieces. |
 |
3
Wash Cut
|
4. Cut Korean radishPeel, wash and cut Korean radish (optional) into quarters. |
 |
4
Peel Wash Cut
|
5. Prepare garlicPeel and wash garlic and cut off the roots. |
 |
5
Peel Wash
Cut off root |
6. Wash green chili peppersWash green chili peppers. |
 |
6
Wash green chili peppers |
7. Cut beefCut the beef into large chunks (about 2” by 2” or a bit larger). |
 |
7
Cut beef into large chunk |
8. Make beef brothIn a large pot, combine all beef broth ingredients: beef, water, garlic, onion, radish, green onions, peppercorn (optional) and cheongju (rice wine, optional). Let it boil with a lid on high heat for 30 min. Save the beef chunks and the broth on the side. (OPTIONAL: You can pour the beef broth through a fine strainer for cleaner broth without floating bits.) |
 |
8
In a large pot, add
Boil High Heat Strain the broth (optional) |
9. Hard boil quail eggsHard boil quail eggs for 10 min (or chicken eggs for 15-10 min) or until the yoke is completely cooked. Immediately cool them down in cold water and peel off the shells. You can add more eggs if you like. |
 |
9
Hard boil
In cold water Peel |
10. Cook in seasoningIn a pot, add the beef broth, the cooked beef, soy sauce, sugar, black pepper, garlic cloves and green chili peppers (optional, you can also used dried red chili pepper). Cook on medium heat with a lid on for another 30 min. |
 |
10
In a pot, boil with lid
Med Heat |
11. Remove meatTurn off the heat. Remove the meat from the sauce and set it aside to cool it down (15-20 min). Add the peeled eggs in the sauce. |
 |
11
Turn off heat Remove meat Add eggs to sauce |
12. Shred meatOnce the meat is cooled down, shred it by hand. |
 |
12
Cool down meat Shred by hand |
13. Add meat to sauceFlip the eggs so the soy sauce is evenly absorbed. Add the shredded meat back into the sauce and let it sit for at least an hour. It tastes even better the next day. |
 |
13
Add meat to sauce Flip eggs Let it sit |
14. ServePlace the shredded meat in a side dish bowl along with a few whole quail eggs as a whole (If you used chicken eggs, you can cut into halves). Drizzle some sauce on top. You can add sesame seeds and shilgochu (shredded dried red chilli peppers) for garnish. For storage, see tips above. |
 |
14
Serve on plate Drizzle sauce on top |
 20 min

Comments
OMG! This is a heavenly dish that you just need to try. I tried it with my kids and they were just killing for it.