


Korean garlic pickles, manuel-jangajji
마늘장아찌


Manuel janjajji, or pickled garlic, is a staple dish in Korea. Good quality garlic is a must to make this dish. Select young garlic cloves with tight skins and no green sprouts. You can pickle the entire head of garlic or peeled individual cloves. It takes six weeks to complete the pickling process, but the wait is worth it. The result is a garlic pickle without its pungent bite with a slightly sweet and tangy crunch. Serve manuel jangajji with rice or as an accompaniment to any main dish. Use the garlic infused soy brine as a dipping or seasoning sauce. It will keep in the refrigerator for up to a year.
Buy Korean ingredients online here.
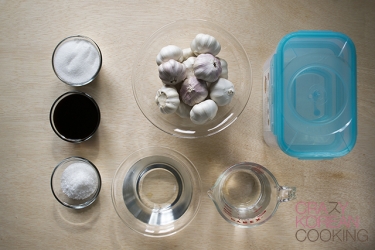
INGREDIENTS
shop these ingredients online »| 15 | Garlic bulb 통마늘 (or garlic cloves) | |
for the brine | ||
| 2 cups | Water 물 (distilled or filtered) | |
| 2 cups | Vinegar 식초 | |
| 6 tbs | Coarse Sea Salt 굵은 소금 | |
for seasoning sauce | ||
| 1 cup | Soy Sauce (regular) 왜간장 | |
| 1 cup | Sugar 설탕 | |
More questions? Please leave your questions below in the comments section. We will do our best to answer as soon as we can.
instructions |
photos |
summary |
|---|---|---|
Ingredient amounts in the recipe instructions are for the default serving size. |
Click to enlarge photos. |
Ingredient amounts in the recipe summary are for the default serving size. |
1. Sterilize container (optional)Boil enough water to completely fill your container. Add some coarse sea salt for extra sanitizing effect. Place a clean e-jen Fermentation and Storage Container |
 |
1
Boil water with salt. Pour in container |
2. Dry containerWhen the water is cooled to be safe to touch, pour the water out. Air-dry the container completely. |
 |
2
Pour out water Air-dry |
3. Cut off rootCut off the root of the whole garlic bulb. If you are using garlic gloves or pre-peeled garlic instead, skip to step 6. |
 |
3
Cut off
|
4. PeelPeel only the outer layer leaving at least one or two layers on the bulb. |
 |
4
Peel
|
5. Cut off stemCut off the stem with scissors leaving ⅜” of it. Do this step last. If you cut off the stem first, dirt can easily enter inside the stem while peeling. |
 |
5
Cut off stem leaving ⅜” |
6. Wash and dryWash the bulbs thoroughly under running water and drain water out in a strainer. |
 |
6
Wash thoroughly Drain water |
7. BrineMake brine solution by mixing 2 cups of vinegar, 2 cups of distilled water and 6 tablespoons of coarse sea salt in a bowl. Place the garlic bulbs in the E-jen Fermentation and Storage Container |
 |
7
Mix
In container
|
8. SealOpen the valve in the middle of the inner vacuum plate by pulling the rubber plug. Slowly push down the plate to the point where the liquid is right to the level of the opening, but not coming through. Close the valve. Place the outer lid on. For a glass jar, simply close the lid. |
 |
8
Insert inner plate Close the valve Close the outer lid |
9. FermentStore the container in room temperature for 1 week. |
 |
9
Store
|
10. Filter brineAfter a week, filter the brine through a strainer and save the filtered broth. |
 |
10
Filter the brine |
11. Make seasoning sauceMix the filtered brine with 1 cup of soy sauce and 1 cup of sugar. Bring it to boil until sugar is completely dissolved. |
 |
11
Mix
Bring it to boil |
12. Pour sauce & maturePut the garlic bulbs back into the container and pour the sauce over the garlic while hot. Let it cool. Seal it and let it mature at room temperature for 10 days. |
 |
12
In container
Let it cool Seal & store
|
13. Boil the sauce again & maturePour the sauce out of the jar and bring it to boil again. When it starts to boil vigorously, take it off the heat. Pour the sauce back into the jar and let it cool. Seal and store at room temperature for 1 month. |
 |
13
Pour the sauce out Boil Pour back into a jar Let it cool Seal & store
|
14. StoreKeep refrigerated. Boil the sauce once a month (as in step 13) for long term storage. This way you can enjoy your garlic pickle throughout the year. |
 |
14
Refrigerate Boil
Enjoy for 1 year |
15. ServeCut 2 to 3 garlic bulbs in half horizontally and place in a side dish plate. Pour 2 to 3 tablespoons of the sauce per them. |
 |
15
Cut 2-3 bulbs
Serve with 2-3 tbs of sauce |