


Bibimbap Recipe 3 - Pyeongyang Bibimbap
평양 비빔밥


Pyeong-yang bibimbap is originated from the city of Pyeong-yang which is the capital of North korea. Pyeong-yang bibimbap is similar to Jeon-ju bibimbap. However, there are minor differences in key ingredients. Pyeong-yang bibimbap includes sautéed beef instead of raw beef, mung bean sprouts instead of soy bean sprouts, diamond shaped egg garnishes and shredded roasted seaweed. Since beef was precious in North Korea, people often used pork instead of beef. Pyeong-yang bibimbap also tends to include a variety of mushrooms such as shiitake mushroom, oyster mushroom and pine mushroom. The mountain vegetables and greens such as gosari, chuinamul, and doraji used in this bibimbap are similar to other types of bibimbap.
Don’t be overwhelmed by the number of toppings though. You can just pick and choose a few of your favorite toppings for your own bibimbap. Another great way to enjoy this recipe is to throw a potluck party. If you are having a gathering of 10 people, each person can bring one type of topping for 10 people. Then everyone can enjoy amazing bibimbap with 10 toppings.
Buy bibimbap ingredients online here.
INGREDIENTS
shop these ingredients online »
Don’t be overwhelmed! You can choose a few toppings you like.
Even for traditional pyeongyang bibimbap, ingredients vary depending on the season. You can substitute in and out with a variety of toppings. Check our our classic bibimbap recipe for a simpler version.
If you want to stay true to the traditional pyeonyang bibimbap, make sure to include mung bean sprouts, cooked beef, seaweed garnish and diamond shaped egg garnishes along with other vegetables and greens of your choice.
When choosing toppings, consider balance in taste, texture and color.
Taste: For pleasant bitterness add toppings like doraji (platycodon root) namul, bom namul, chui namul and san namul.
For sweetness, add carrots or zucchini.
Texture: If you like a bit of a mushy texture you can add zucchini and mushrooms, whereas things like platycodon are more crunchy.
Color: You want to use a variety of colors to create a beautiful and contrasting array. (For example, if you have spinach perhaps you don't need to use two other greens. You want different colors like red, white, brown, etc.) When you arrange the ingredients, try to put contrasting colors next to each other, and similar colors as far apart as possible.
Traditionally Korean believed that bibimbap should include the 5 colors: red, blue (or green), brown, white and yellow, which symbolize the harmony of the 5 elements: fire, water, tree, metal and earth. They believed that this creates a balanced meal which is good for health.
You can buy Korean dried vegetables online here.
Frequently Asked Questions
Can I blanch everything at once?
There are three reasons why we blanching things separately. First, it allows you to create a killer presentation. If you mix everything up, it won't look as pretty. Secondly, ingredients get cooked at different speeds. So, you may end up with some things undercooked or others overcooked. Thirdly, when you cook things together, the flavors can be infused to create a different flavor than the intended one. However, I am not going to discourage you from experimenting and adapting the recipe to your liking. After all, cooking is a creative process!
Not all the toppings are hot after following this recipe. Is that normal?
Traditionally, the veggies (na-mul) on bibimbap are not supposed to be hot. Na-muls are room temperature side dishes that you can also use in bibimbap. If you prefer everything to be hot, add all the topping when you pre-heat the bowl and rice and leave the whole thing on the stove on low heat for awhile, with a cover or a lid. One of our viewers suggested putting the whole thing in the oven for awhile.
Do I have to use a stone bowl for bibimbap?
No, bibimbap can be served in a regular bowl. But, it's definitely a step up in terms of taste and presentation.
What is a stone bowl and where can I buy one?
“Stone Bowl” is the common North American name for the sizzling bibimbap bowl, directly translated from “Dol Sot” bibimbap. Natural stone bowls are mostly used in restaurants for the unique look, but many Koreans use ceramic stoneware at home for its ease of use and sanitary benefit. In terms of function, it performs just like natural stone. One primary example is its sizzling effect. Buy stone bowls here
Why are stone bowls so big and how many people can I serve with one stone bowl?
Stone bowls are traditionally for individual servings (meaning one bowl is for one person), though they are big. But, that doesn't mean you have to fill up the bowl to the top if you are not a big eater. Big bowls are used because it's easy to mix things up without making a mess. But then again, I could see the fully filled dolsot feeding 2-3 small eaters if people want to use it as a communal bowl.
Why can't I get the crust at the bottom?
There could be two reasons for this. ONE, you may be using the wrong type of rice. For all Korean cooking, use short grain rice. (It's also called sticky rice. Koreans and Japanese eat this type of rice). Other types of rice may not be sticky enough. Also, your rice can be cooked too dry. TWO, you may just need to leave your bowl on the stove for a longer time. It takes awhile to pre-heat the dolsot, so you probably want to leave the rice in the bowl for 10-20 min after pre-heating it. You can try to put it on medium after pre-heating, but you will have to check it frequently to prevent burning.
More questions? Please leave your questions below in the comment section. We will do our best to answer as soon as we can.
instructions |
photos |
summary |
|---|---|---|
Ingredient amounts in the recipe instructions are for the default serving size. |
Click to enlarge photos. |
Ingredient amounts in the recipe summary are for the default serving size. |
1. Pre-soak vegetablesSoak 35g of dried gosari (fernbrake), 35g of dried doraji (platycodon), 30g of dried chuinamul in cold water separately for at least 3 hours. Overnight is ideal. |
 |
1
Soak in water
|
2. Cook riceWash 3 cups of white short grain rice twice and drain completely. Add 3 cups of water and cook in a rice cooker. See how to cook rice in pot here. This ail yield about 6 cups of cooked rice (1½ cups of cooked rice for 1 serving). |
 |
2
Wash
Drain Add
Cook |
3. Wash dorajiDrain pre-soaked doraji (platycodon). Sprinkle 1 tablespoon of coarse sea salt all over doraji and rub them for a min. Wash thoroughly and squeeze water out by hand. |
 |
3
Sprinkle doraji with
Rub Wash thoroughly Squeeze water out |
4. Wash gosari & chuinamulWash pre-soaked gosari and chuinamul twice in cold water. Squeeze water out by hand. |
 |
4
Wash twice
Squeeze water out |
5. Blanch gosari and chuinamulBlanch gosari (fernbrake) and chuinamul (aster scaber) separately in boiling water with a pinch of salt (gosari: until soft, 10-20 min depending on how long you soaked, chuinamul: 10-20 min depending on how long you soaked). Rinse in cold water and squeeze all the water out with your hands. Blanching time may vary depending on how soaked your vegetables are. As a rule of thumb, blanch until they just become soft. Don’t over cook. |
 |
5
Blanch in boiling water with ⅛ teaspoon salt.
Rinse in cold water Squeeze water out |
6. Blanch minariWash 100g of minari (water dropwort) thoroughly and drain. Blanch minari in boiling water with a pinch of salt for about 1 min. Rinse in cold water and squeeze all the water out with your hands. (*You can use spinach instead of minari.) |
 |
6
Wash & drain
Blanch in boiling water with ⅛ teaspoon salt.
Rinse in cold water Squeeze water out |
7. Soak and wash mushroomsSoak dried 4-5 shiitake mushrooms in sugar water (1 tablespoon sugar + 2 cups water) for 30 min or until they become soft. Then, wash throughly and squeeze all the water out. If you have fresh Shiitake mushrooms, just wash them in cold water. |
 |
7
Soak in cold water
Wash Squeeze water out |
8. Julienne mushroomsJulienne shiitake mushrooms |
 |
8
Julienne
|
9. Prepare mung bean sproutsRemove any rotten (brown) heads or tails from 100g of mung bean sprouts. Rinse thoroughly in water and drain. |
 |
9
Remove tail Rinse thoroughly Drain |
10. Blanch mung bean sproutsBlanch mung bean sprouts in boiling water with a pinch of salt for about 1 - 2 min or until soft. Rinse in cold water and drain water out in a strainer (don’t squeeze). |
 |
10
Blanch mung bean sprouts in boiling water
Rinse in cold water Drain in strainer |
11. Julienne zucchiniPeel and wash ½ Korean zucchini (2” length). Julienne it into thin strips. Sprinkle a pinch of salt all over and let it sit for a few minutes. |
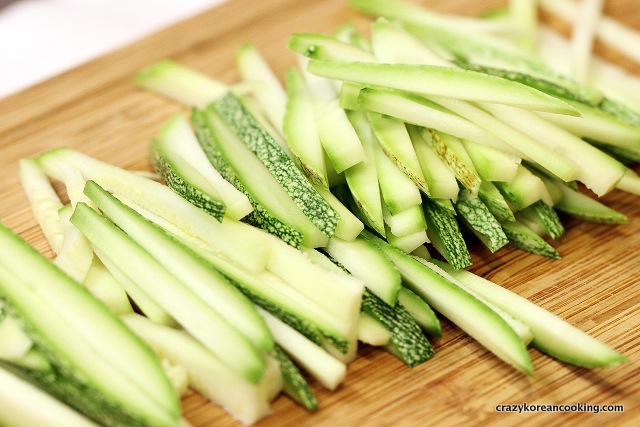 |
11
Peel & wash
Julienne Sprinkle
Let it sit |
12. Julienne carrotPeel and wash ½ carrot (2” length). Julienne it into thin strips. Sprinkle a pinch of salt all over and let it sit for a few minutes. |
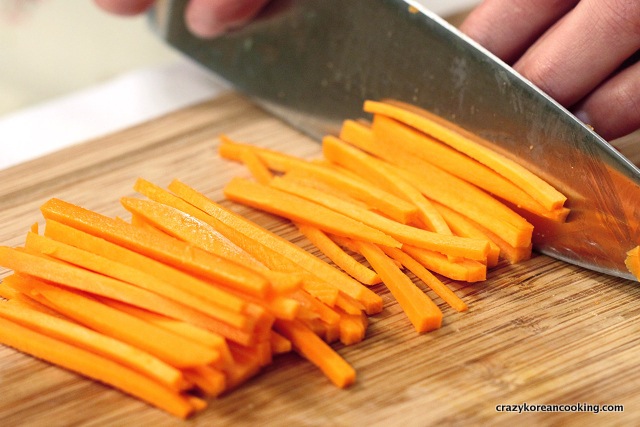 |
12
Peel & wash
Julienne Sprinkle
Let it sit |
13. Julienne radishPeel, wash and julienne 200g of Korean radish (about 2” length). Sprinkle with a pinch of salt and let it sit for a few minutes. |
 |
13
Peel, wash
Julienne Sprinkle
Let it sit |
14. Prepare garlic and green onionsPeel and mince 5 cloves of garlic and finely chop 3 green onions. |
 |
14
Mince 4-5 cloves garlic Chop 3 green onions |
15. Prepare beefJulienne 100g of beef. |
 |
15
Julienne 100g beef |
16. Marinate beefMarinate beef with 1 teaspoon of soy sauce, ½ teaspoon of sugar, ½ teaspoon of minced garlic, 1 teaspoon of sesame oil, a pinch of black pepper, 1 teaspoon of chopped green onions and ½ teaspoon of sesame seeds. Cover and store in the fridge. |
 |
16
Marinate with
Regrigerate |
17. Sauté gosariCoat a pan with 1 teaspoon of sesame oil. Sauté gosari (fernbrake) with ½ teaspoon of minced garlic, for 3 min on medium heat. Add 2 tablespoons of water, 1 tablespoon of gukganjang (soy sauce for soup), 1 teaspoon chopped green onions and saute for another 5-10 min until soft. If it starts to stick to the bottom, you can add a bit more water. Turn off the heat. Add a pinch of black pepper and ½ teaspoon of sesame seeds. *Cooking time may differ depending on how the gosari was dried and how long the gosari was soaked in water. |
 |
17
Sauté gosari Med Heat
Add
Sauté Med Heat Off heat and add
|
18. Sauté dorajiSauté doraji (platycodon roots) exactly same way as gosari. |
 |
18
Sauté doraji Med Heat
Add
Sauté Med Heat Off heat and add
|
19. Sauté shiitake mushroomsSauté julienned shiitake mushrooms with ½ teaspoon of sesame oil, with 1 teaspoon of soy sauce, ½ teaspoon of sugar, ½ teaspoon of minced garlic, 1 teaspoon of chopped green onions, a pinch of black pepper and ½ teaspoon of sesame seeds on high heat for 3 min or until cooked. |
 |
19
Sauté mushrooms High Heat
|
20. Sauté carrotsSauté carrots with 1 teaspoon of sesame oil, ⅛-¼ teaspoon of salt and a pinch of black pepper on medium heat for 5 min or until cooked. |
 |
20
Sauté carrots Med Heat
|
21. Sauté zucchiniSauté zucchini with 1 teaspoon of sesame oil, ⅛-¼ teaspoon of salt, ¼ teaspoon of minced garlic, 1 teaspoon of chopped green onions, a pinch of black pepper and ½ teaspoon of sesame seeds on medium heat for 2-3 min or until cooked. |
 |
21
Sauté zucchini Med Heat
|
22. Season minariSeason blanched minari with the following and mix well with your hand: ½ teaspoon of soy sauce, ¼ teaspoon of sugar, ½ teaspoon of minced garlic, ¼ teaspoon of sesame oil and 1 teaspoon of chopped green onions. |
 |
22
Season minari
|
23. Season chuinamulSeason chuinamul (aster scaber) with the following and mix well with your hand: ⅛-¼ teaspoon of salt, ¼ teaspoon of gukganjang (soy sauce for soup), ½ teaspoon of minced garlic, 1 teaspoon of sesame oil, 1 teaspoon of chopped green onions and ½ teaspoon of sesame seeds. |
 |
23
Season chuinamul
|
24. Season mung bean sproutsSeason mung bean sprouts with the following and mix well with your hand: ⅛-¼ teaspoon of salt, ¼ teaspoon of gukganjang (soy sauce for soup), ½ teaspoon of minced garlic, 1 teaspoon of sesame oil, 1 teaspoon of chopped green onions, a pinch of black pepper and ½ teaspoon of sesame seeds. |
 |
24
Season mung bean sprouts
|
25. Season radishSeason Korean radish with ¾-1 teaspoon of salt, 1 teaspoon of sugar, 2 teaspoon of vinegar, ½ teaspoon of garlic, 1 teaspoon of chopped green onions, ½ teaspoon of sesame seeds and 1 teaspoon of gochugaru (red chili flakes). |
 |
25
Season radish
|
26. Prepare eggs (optional)Separate 2 egg yolks from egg whites into separate bowls. Season each of the yolks and whites with a pinch of salt and beat it. |
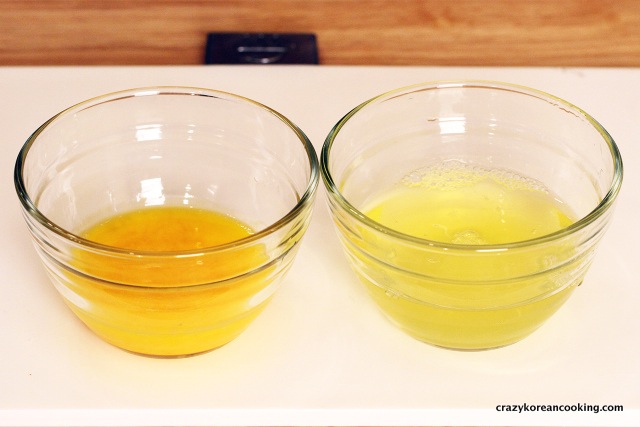 |
26
Separate
Season
Beat |
27. Cook eggs (optional)While the broth is boiling, preheat a non-stick pan on low heat for a minute. Lightly coat a non-stick pan with vegetable oil and spread the egg yolks as thin as possible by rotating the pan in circular motion, just as if making crepes. When it’s fully cooked, remove it from the pan and let it cool on the side. Repeat the same for egg whites. For more vibrant colors, cook on low heat. |
 |
27
Preheat Low Heat Coat pan with oil Spread egg yolks thin Cook Low Heat Cool down Repeat for egg whites |
28. Cut eggs (optional)Once the cooked eggs are cooled down, cut them into diamond shapes. If the eggs are not fully cooled down, they won’t cut cleanly. |
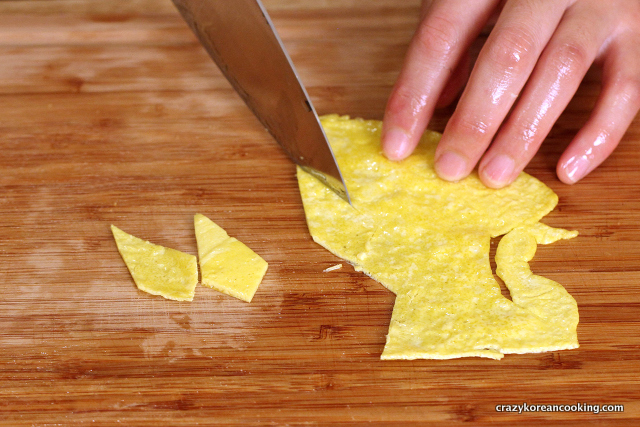 |
28
Cut into diamond shape |
29. Sauté beefSauté marinated beef on high heat for 1-2 min or until cooked. |
 |
29
Sauté marinated beef High Heat
or until cooked |
30. Cut seaweedCut roasted seaweed into thin strips with scissors. |
 |
30
Cut seaweed into thin strips |
31. Make bibimbap sauce (optional)Mix and sauté 3 tablespoons of red chili paste, 1½ tablespoon of Mul Yeot (see tips for substitution), 1½ tablespoons sesame oil, 1 teaspoon of minced garlic and 1 teaspoon of sesame seeds on medium heat for about 2 minutes. Stir constantly so it doesn’t stick to the pan. You can make more if you like your bibimbap spicy. |
 |
31
Mix & sauté
Med Heat |
32. Heat stone bowls (optional)(OPTIONAL for sizzling dolsot bibimbap) Coat 4 stone bowls with vegetable oil or sesame oil and place a bed of rice at the bottom of stone bowls and leave them on LOW heat for 15-20 min (or until golden crust is formed at the bottom). |
 |
32
Coat stone bowl with oil Place a bed of rice Low Heat (golden crust) |
33. Top with ingredientsAdd more rice to each bowl. For each bowl, top with all ingredients so that contrasting colors are beside each other. Place sautéed beef and seaweed strips in the middle. Add diamond egg garnishes. If you prefer all ingredients to be hot, add everything when you preheat the stone bowl and rice (in the previous step). You don’t have to completely fill up the bowl. Stone bowls are big so people can mix the content without making a mess. If you are a small eater, use a smaller amount of rice. |
 |
33
Add more rice Top with ingredients |
34. Serve and enjoyServe with the bibimbap sauce (or plain gochujang) on the side. To enjoy the dish, add the bibimbap sauce to your liking and mix everything well. |
 |
34
Serve on the side
|
 180 min


Comments